The default WooCommerce statuses available are Pending, Processing, On-hold, Completed, Cancelled, Refunded, and Failed.

A common request is how to add a custom order status in WooCommerce.
For stores selling physical products, it would be super useful to have a custom status such as “shipped”. If you are selling appointments, then maybe you want to have a status like “appointment confirmed”.
Here’s how to add a custom WooCommerce order status programmatically (is that a word?); i.e. without using a plugin!
Example: Add a “shipped” custom order status in WooCommerce
In this basic example, I will add a custom order status called “shipped”.
Step 1: Register the status in WordPress
We first need to register the status when WordPress is initialized. We can use the WordPress init action hook to trigger our custom function when WordPress is almost fully loaded. We then use the builtin WordPress function register_post_status to register our custom status.
For WooCommerce statuses, it is best practice to use ‘wc-‘ as a prefix to your custom status. E.g. ‘wc-shipped‘, ‘wc-confirmed‘, etc.
function register_shipped_order_status() {

    register_post_status(
        'wc-shipped', // woocommerce status should use 'wc-' prefix
        array(
            'label'     => 'Shipped', // name you want to use
            'public'    => true, // allow orders with this status to be displayed on site
            'show_in_admin_status_list' => true, // show in status list on top of Orders page, i.e Completed (1), Pending (2), etc..
            'label_count'   => _n_noop(  // sets display format in admin status list
                'Shipped <span class="count">(%s)</span>', // singular format, i.e. Shipped (1)
                'Shipped <span class="count">(%s)</span>'  // plural format, i.e. Shipped (2)
            )
    ) );

}
add_action( 'init', 'register_shipped_order_status' );
Step 2: Add status to WooCommerce order status list
Now, that our custom status is registered properly in WordPress, we just have to make it to show up in WooCommerce.
To do this, we use the filter hook wc_order_statuses, and return the new array of order statuses that we want to appear.
function add_shipped_order_status ($old_order_statuses) {
    $new_order_statuses = array(
        'wc-pending'    => _x( 'Pending payment', 'Order status', 'woocommerce' ),
        'wc-processing' => _x( 'Processing', 'Order status', 'woocommerce' ),
        'wc-on-hold'    => _x( 'On hold', 'Order status', 'woocommerce' ),
        // insert our custom order status here:
        'wc-shipped'    => _x( 'Shipped', 'Order status', 'woocommerce' ),
        //
        'wc-completed'  => _x( 'Completed', 'Order status', 'woocommerce' ),
        'wc-cancelled'  => _x( 'Cancelled', 'Order status', 'woocommerce' ),
        'wc-refunded'   => _x( 'Refunded', 'Order status', 'woocommerce' ),
        'wc-failed'     => _x( 'Failed', 'Order status', 'woocommerce' ),
    );

    return $new_order_statuses;
}

add_filter( 'wc_order_statuses', 'add_shipped_order_status');
In the above snippet, I just copied/pasted the original list, and inserted our new status where I wanted. Another way is to loop through the existing old statuses and insert your custom status like so:
function add_shipped_order_status ($old_order_statuses) {
    $new_order_statuses = array(); // create new blank array to fill

    // loop through old statuses
    foreach ( $old_order_statuses as $id => $label ) {
        $new_order_statuses[ $id ] = $label; // add each old status to new array

        if ( 'wc-processing' === $id ) { // insert custom status after "Proccessing" status
            $new_order_statuses['wc-shipped'] = 'Shipped';
        }
    }

    return $new_order_statuses;
}

add_filter( 'wc_order_statuses', 'add_shipped_order_status');
Sometimes it’s easier to just see the whole list, especially if you want to reorder or rename things.
Final Snippet
// PART 1: REGISTER STATUS
function register_shipped_order_status() {

    register_post_status(
        'wc-shipped', // woocommerce status should use 'wc-' prefix
        array(
            'label'     => 'Shipped', // name you want to use
            'public'    => true, // allow orders with this status to be displayed on site
            'show_in_admin_status_list' => true, // show in status list on Orders page
            'label_count'   => _n_noop(  // sets text format for admin_status_list
                'Shipped <span class="count">(%s)</span>', // singular format
                'Shipped <span class="count">(%s)</span>'  // plural format
            )
    ) );

}
add_action( 'init', 'register_shipped_order_status' );

// PART 2: ADD STATUS TO WOOCOMMERCE
function add_shipped_order_status ($old_order_statuses) {
    $new_order_statuses = array(
        'wc-pending'    => _x( 'Pending payment', 'Order status', 'woocommerce' ),
        'wc-processing' => _x( 'Processing', 'Order status', 'woocommerce' ),
        'wc-on-hold'    => _x( 'On hold', 'Order status', 'woocommerce' ),
        // insert our custom order status here:
        'wc-shipped'    => _x( 'Shipped', 'Order status', 'woocommerce' ),
        //
        'wc-completed'  => _x( 'Completed', 'Order status', 'woocommerce' ),
        'wc-cancelled'  => _x( 'Cancelled', 'Order status', 'woocommerce' ),
        'wc-refunded'   => _x( 'Refunded', 'Order status', 'woocommerce' ),
        'wc-failed'     => _x( 'Failed', 'Order status', 'woocommerce' ),
    );

    return $new_order_statuses;
}

add_filter( 'wc_order_statuses', 'add_shipped_order_status');
End result:
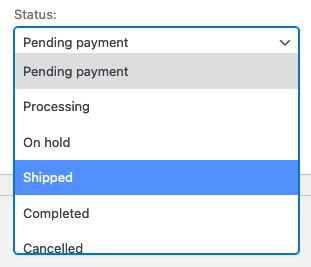

Hope this helps! 🥸